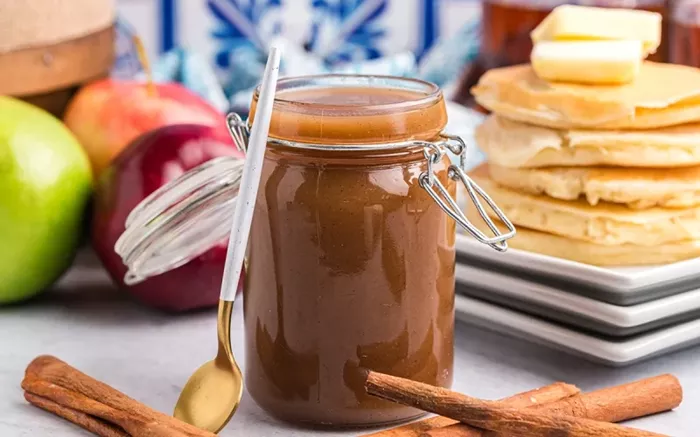
Boiled apple cider syrup is a thick, sweet syrup made by slowly reducing fresh apple cider. It has a deep apple flavor and a rich, caramel-like taste. This syrup is also known as apple molasses. People have made it for centuries, especially in New England. It’s natural, with no added sugar, and it’s a great way to preserve the taste of apples for months.
Why Make It at Home?
Making boiled apple cider syrup at home gives you full control over the ingredients. It’s cost-effective and requires only one ingredient: fresh apple cider. Homemade syrup is free from preservatives and additives. The process is simple, though it takes time. The flavor is worth it. It’s perfect for pancakes, yogurt, oatmeal, baking, or cocktails.
What You Need
You don’t need any special tools. Here’s a short list:
- Fresh apple cider (not apple juice)
- Large, heavy-bottomed pot (non-reactive like stainless steel)
- Wooden spoon
- Fine mesh strainer (optional)
- Glass jars or bottles for storage
Step-by-Step Guide to Making Boiled Apple Cider Syrup
Step 1: Choose Good Cider
Start with fresh, unfiltered apple cider. Look for cider from local farms or markets. Do not use apple juice. Apple juice is filtered and lacks the depth of flavor. The better the cider, the better your syrup will taste.
Step 2: Pour the Cider into the Pot
Pour the apple cider into a large, deep pot. Make sure there’s plenty of space because the cider will bubble as it cooks. Start with at least 1 gallon (3.8 liters) of cider. This will give you about 1 cup of syrup after reduction.
Step 3: Bring It to a Boil
Place the pot on medium-high heat. Bring the cider to a gentle boil. Stir it occasionally to prevent scorching. Once it starts boiling, reduce the heat to medium-low. The goal is a steady simmer, not a rapid boil.
Step 4: Simmer and Reduce
This is the longest part. Let the cider simmer uncovered for 2 to 4 hours. Stir every 15 to 20 minutes. As it cooks, the cider will darken and thicken. The volume will drop. Be patient. The slower you reduce, the richer the flavor.
Step 5: Check for Doneness
You’ll know the syrup is ready when it coats the back of a spoon. It should be thick but pourable. You can also measure the volume. If you started with 1 gallon, reduce it down to about 1 cup. That’s the right consistency.
Step 6: Strain (Optional)
If you want a very smooth syrup, you can strain it through a fine mesh strainer. This removes any solids or pulp. If your cider was already smooth, this step may not be necessary.
Step 7: Cool and Store
Let the syrup cool completely. Then pour it into clean glass jars or bottles. Store it in the refrigerator. It will keep for up to 6 months. For long-term storage, you can also freeze it in small containers.
Tips for Best Results
- Use a wide pot to speed up reduction.
- Keep heat low to avoid burning.
- Don’t leave the pot unattended.
- Add a cinnamon stick or clove for extra flavor if you like.
How to Use Boiled Apple Cider Syrup
This syrup is very versatile. You can drizzle it over:
- Pancakes and waffles
- Vanilla ice cream
- Oatmeal or granola
- Baked goods like muffins or cakes
- Roasted vegetables
- Warm drinks like tea or hot toddies
Flavor Variations
Though traditional syrup uses only apple cider, you can try fun twists:
- Add a cinnamon stick during simmering
- Include a small piece of ginger
- Add a strip of orange peel for citrus notes
- Mix in a little maple syrup at the end
Frequently Asked Questions
Can I use apple juice instead of cider?
No. Apple juice is too filtered and sweet. It won’t give the same result.
Can I make a big batch?
Yes. You can reduce several gallons at once if your pot is large enough. Just be sure to stir and monitor closely.
Can I can the syrup?
Boiled cider is not acidic enough for safe water-bath canning. It’s best to refrigerate or freeze it.
Final Thoughts
Boiled apple cider syrup is simple, natural, and delicious. With only one ingredient and a bit of time, you can create a rich syrup that brings out the best of apple season. Use it in breakfast, desserts, drinks, or cooking. Try it once, and it might become your new fall favorite.
Related topics:


